Generally, Zmodo DVR systems are considered high-pitched audio and video solutions to play live videos, record, perform remote previews, and more. Likewise, modern Zmodo cameras come with DVR and NVR systems. These are available according to the wired or wireless models that you choose. Similarly, if you are a Zmodo user and want to know the steps for hooking zmodo security cameras to a DVR.
Further, before we explore the configuration of the DVR with your CCTVs, understand this product a little bit. Commonly, DVR comes with front and rear panels, which are available as 4 or 8 channels. But the process of connection is almost similar. Additionally, to learn more about how to hook zmodo to DVR, explore this piece of content carefully.
What are the quick steps for hooking Zmodo security cameras to a DVR?
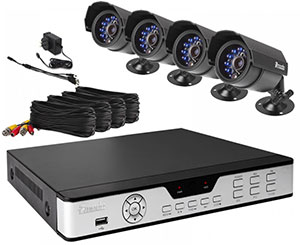
Moreover, the DVR stands for Digital Video Recorder, which stores and plays video and has multiple connectivity features. To begin configuring the DVR, you must first unpack your camera and DVR box.
After that, look at the necessary cables provided in the package, such as a mouse, USB cable, power adaptor, etc. Also, ensure you have a hard disk to install in this DVR. When getting ready with all the necessities, follow the below-mentioned steps to understand how to hook zmodo to DVR:
Preparation to connect DVR to the Zmodo CCTVs
- Initially, remove the packing film from the DVR and cameras.
- Bring the Data and Power cords given in the box to join connectors.
- Next, position the hard disk in the DVR by removing the upper cover and connecting the Power/Data cables connectors efficiently.
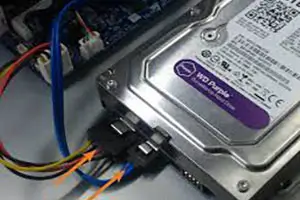
- After fixing the connections, place the cover on the DVR and tighten using screws.
- Now, take the power cord/adaptor/splitter, and join them.
- Afterward, insert the electrical component into the DC 12V port on the DVR’s back.
- Next, plug in the power adaptor to a nearby power source or use a Surge Protector.
- Moving further, connect the mouse to the USB Port on the rear panel of the DVR.
- Further, insert the given batteries into the remote by opening its case.
- After that, join the Digital Video Recorder to the HD monitor using a VGA cable (you need to buy it separately, not included in the pack).
Hooking Zmodo security cameras to a DVR
- To start with this, connect the Yellow (BNC) cable to one end of the Connector cable.
- To fix the connections tightly, twist the cable ends.
- After that, fix the red cable to the other end of the connector cord.

- Now, take the remaining cords (power/video) to join them to the Yellow (BNC) wire and then affix it to the CH1 port of the DVR’s Rear panel.
- Likewise, twist the cable ends to lock them perfectly.
- Afterward, tie up the red power cord to the black 4-port splitter cable.
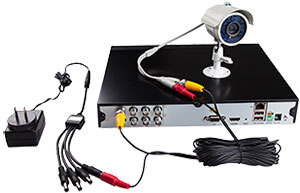
- Moving forward, you can join the other CCTVs as you link this camera to the DVR.
- At last, link the remaining final single splitter end to the Power adaptor.
- Here, Hooking zmodo security cameras to a DVR procedure finishes successfully.
Test Zmodo security devices and DVR
- After finishing the above-discussed setup, it’s time to connect the DVR to the router.
- To do so, bring an ethernet cable and join one end to the digital video recorder and the other to the DVR.
- Next to this, consider the user manual and link the HD monitor to the video recorder.
- After that, turn on the CCTVs, DVR, and the monitor.
- Hereon, you watch the live view on the monitor through the camera’s testing mode.
- If all the cameras are working fine, then use the Zmodo application or web address to log in and customize your Zmodo security system.
- In the end, you are all set with the Hooking zmodo security cameras to a DVR process.
Final Words
In a nutshell, this informative guide will provide you with deep insights for Hooking zmodo security cameras to a DVR system. Additionally, you find step-by-step instructions to configure your DVR to the router’s network and CCTVs to this video recorder. Now, your cameras are ready to use for 24×7 hours security on your premises.